Workspaces
Recaf operates in workspaces. Each workspace can have one or more files loaded at a time. The first file loaded will be marked as the primary resource. All following files are secondary resources. In addition to these two resources, there are two additional back-end resources that add functionality to Recaf.
- Classes
- Resources
A primary resource contains all the class files and resources of the input to be modified.
- Classes
- Resources
A secondary resource contains supporting class files and resources. They are for reference purposes and are used to bolster things like ease of navigation, recompilation, and proper stack-frame generation. Multiple secondary resources may exist in a workspace.
- Classes
The classpath resource is a hidden resource common to all workspaces. It allows Recaf to read class files directly from memory.
- Classes
The phantom resource is used to store temporary class files that are generated to bolster things like recompilation and proper stack-frame generation.
If the phantom generation process fails, you may have to provide libraries as backing resources to use some features. But overall it should not be too big of a deal.
Note: This is regenerated each time a new workspace is created and runs in the background until completion.
It currently does not handle cases where generated methods belong to method hierarchies that get renamed.
The primary resource is the file that will be modified. Recaf's primary functionality (editing, searching, etc) uses only this file.
Secondary resources may be used as supporting libraries or for reference purposes. Classes in secondary resources are still navigable like those in the primary resource, however they are read-only. They cannot be modified.
Note: Secondary resources will be used as compiler classpath items when recompiling code in the primary resource.
Supported file types include:
- Class files
- Jar files
- War files
Note: You can also attach to currently running Java programs by opening the "Attach" menu.
Creating a workspace
You can create a new workspace by selecting "File > Load". This will show a file prompt where you can select the primary resource. Alternatively you can drag-and-drop a file onto the left-most panel.
Once the workspace is created with the primary resource you can add additional secondary resources with "File > Add library".
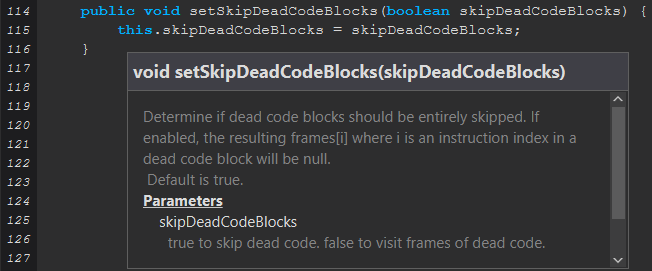
All resources can have sources and JavaDocs attached as references. Right click on the resource and select which item you would like to attach. After attaching JavaDocs you can hover over a method to show a documentation popup.
 |
 |
Note: You can supply a file to Recaf to load initially on startup using the command line argument
--input <path/to/file>
Navigating the workspace
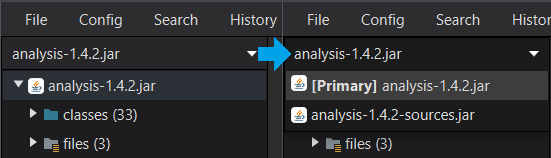
Considering the fact that Recaf supports multiple resources in a workspace there needs to be a way to navigate to the files of each resource. This is done by inserting a dropdown menu at the top of the navigation tree. In this menu the primary resource will be listed at the top and all additional libraries will be added below it. Selecting one of these items will replace the tree with the contents of that file.
Each resource's navigation tree is persistent. This means that when a directory is opened it will stay open even after switching to another resource. When you switch back the tree will be just as it was before.
In order to quickly navigate to files it would be useful for there to be a filter. At the bottom of the navigation tree is a filter box. The content of the filter will show all tree items that contain the given path. For example java/lang/String and String will show the String class in the navigation tree (Along with StringBuilder since it contains String).
Saving a file
As covered in the editing mode documentation changes are first saved locally inside of Recaf when you hit the save keybind (Control + S). This does not update the actual file on the system. In order to apply the changes you made you need to export the program after saving each change. To do this select "File > Export program" from the menu bar. This will prompt you to give a file location to save the file to.
Saving a workspace
If you want to save the configured workspace you may use "File > Export workspace". This will prompt you to give a file location to save the workspace to. This will create a JSON file that holds references to each resource in the workspace. This JSON file can be used when loading a file (from either the menu prompt, or by drag-and-drop) to open all items in the workspace at once.
Note: Workspaces that use runtime components such as the attach function to connect to live processes cannot be exported to a JSON.